Learn Systems Design
  • Home
  • About
  • Protocol
    • Log On To POS System
    • Log Off POS System
    • Unlock A Terminal
    • Check A Printer
    • Back Up Data
    • Download Join Me App
    • Install Hyperterminal 6.3
    • Install the DC ftp App
    • Install WinSCP .ftp program
    • Install Putty
  • Back Office Tutorials
    • End Of Day >
      • Back Office End of Day Video
    • End Of Month >
      • End of Month Video Tutorial
    • Master File Maintenance >
      • Master File Overview
      • Add A Student To The Master File
      • Change Information In The Master File
      • Menu Item Maintenance >
        • Enter New Menu Item
        • Change A Menu Item
        • Move A Menu
        • Menu Item Cost
      • Touch Screen Button Maintenance
      • Correct A Student Balance
      • Meal Input Corrections
      • Meals Per Labor Hour
      • Set A Credit Limit On Charges
      • Teacher Quick Input
    • About Reports >
      • Reports Menu Overview >
        • Print a Student Status Report
      • Other Reports Menu Overview >
        • Print Summary by School
      • Printing From Your PC >
        • Find Your Server IP Address
    • Site Based Claim >
      • File A Digital Reimbursement Claim
      • File A Manual Reimbursement Claim
    • Student Meal Balance Inquiry >
      • Student Meal Inquiry
      • Student Cash Inquiry
      • Print a Student Statement >
        • Student Statement Example
    • Transfer Funds Between Accounts
    • Print ID Cards and Homeroom Bar Code Lists >
      • Print Individual ID Cards
      • Print Home Room Bar Code Lists
    • The Home Room Input Feature
    • The Express Input Feature
    • Shortcut Entries >
      • Cash Report Shortcut
      • Meal Report Shortcut
      • Correct Reconciliation Shortcut
    • Quick Input Programs >
      • Employee Account Input
      • Quick Home Room Input
      • Direct Cert Quick Input
      • Teacher Homeroom Input
    • Community Eligibility Provision
    • AR Reports Information >
      • Section 100 Answers
      • Upload Letter Templates
      • Export Free and Reduced Students
      • Export Denied Students
      • Export Categorically Eligibile Students
      • Export Verification Report
      • Rated Meal Summary Report
      • Export Accuclaim Report For Review Month
      • Export the F R D .CVS File
    • Displaced Students Instructions
    • Find Server IP
    • Program and Non Program Revenue Reports >
      • Expanded Income Analysis >
        • Expanded Income Analysis Example
      • Expanded Sales Summary Report >
        • Expanded Sales Summary Report Example
      • Meal Summary By Date Range >
        • Meal Summary By Date Range Exammple
    • CoVid19 Set Up Process
    • SSO Preperation
    • Change SSO Reimbursement Rates
  • Application Processing
    • Application Program Overview
    • Basic Family Application
    • Multiple Students On Application
    • Multiple Incomes On Application
    • Direct Certification >
      • DC Medicaid Reduce Proceedures >
        • Medicaid Reduced Benefit Letter
        • Set Up User Code
        • Find Student on an Application
        • Print Letter of Benefits
    • Community Elgibility Report >
      • Community Elgibility Report Form
      • CEP Report Instructions
    • Change Grace Period
    • Temporary Status Expiration >
      • Print Letters to Expiring Statuses
      • Print A List Of Expiring Statuses >
        • The Expiring List Report
      • Update Temporary Student Statuses
    • Application Verification Process >
      • Running the Selection Process
      • Print Verification Notification Letters >
        • Printing Second Notice Letters
      • Change Grace Period
      • Print Audit Record Form
      • Print Application Totals Report >
        • Application Totals Report
      • Print Archived Application Totals Report >
        • Application Totals Report from Archives
      • Recording Verification Results
      • Print Adverse Action Letters
      • Print Verification Results Report >
        • Verification Results Report Example
    • Required March 2022 CEP Report >
      • March CEP Report Example
    • PK Categorically Eligible Status
    • PK Audit Report
    • PK True Eco Report
  • Instruction Sheets
    • Changing Meal and Cash History
    • Audit Preperation Instructions
    • Saving .pdf File To iPad
    • Back Office Admin Manual
    • POS Instruction Handout
    • Cashiers Manual
    • Cashier Quick Start Card
    • Correcting Cash Mistakes
    • Correcting Meal Mistakes
    • Direct Certification
    • CE File Upload Instructions
    • Installing Hyperterminal 6.3
    • Program Function Keys >
      • Touch Screen Button Layout
    • Print A Report To Excell
    • Calibrate Touchscreen
    • Summer Feeding Set Up
    • Negative Balance Email Setup
    • Set Up Teacher in LMN
  • Helpful Links
  • Director Orentation
  • Learning For Cashiers
    • Touch Screen Tutorial
    • Touch Screen Overview
    • Home Room Option
    • Log In To The POS
    • Log Off POS Terminal >
      • Log Off Acer
      • Log Off Termteck
    • Recording Meals >
      • Record A Free Students Meal
      • Record A Paid Students Meal
      • Record Ala Carte Sales
      • Recording Adult Meals
      • Recording Checks
      • POS Homeroom Option
    • Cash Receipts Posting >
      • Recording Cash Payments
      • Recording Check Payments
    • Cashier End Of Day Actions >
      • Print Cash Report >
        • The Cash Report
      • Print Meal Transaction Report >
        • The Meal Report
      • Clerk Reconciliation >
        • The Clerk Reconciliation Report
      • Campus Reconciliation >
        • The Campus Reconciliation Report
      • Managers Daily Deposit
    • Correcting Meal And Cash Mistakes >
      • Correcting Meal Mistakes
      • Correcting Cash Mistakes
    • Student Meal Balance Inquiry >
      • Student Meal Inquiry
      • Student Cash Inquiry
    • Cashier Report Menu >
      • Print Student Balances >
        • The Student Balances Report
      • Print School Menu Listing >
        • The School Menu Listing
      • Print Negative Balance Notices
    • After School Snacks >
      • Recording Snacks For Individuals
      • Recording Snacks Multiple Students
    • New Cashier Option >
      • Cashier End of Day Actions
      • Video on New Cashier Option
      • Cashier Option Change Feature
      • New Cashier Reports Option
    • Additional POS Features >
      • The Look Up Feature
      • The Received Listing
      • Quick Meal Totals
      • Balance Inquiry
      • Cash History Inquiry
    • Printable Documentation >
      • Cashier Quick Start Card
      • Touch Screen Information
      • Cashiers Manual
    • If Your Printer Won't Print
  • Contact Us
  • New Install Form
  • Sign Up Page
  • Classroom Help
  • Video Tutorials
    • Change Status of Meal Served
    • Print DC By Association List
  • P-EBT Program
  • Meals in Classroom
  • Non-Congregant Meals
    • NC POS Procedures
    • Clerk Handout NC Meals
    • Holiday Calendar
    • Correcting Prior Day Meals NC

Download the join.me Application So We Can Share Screens

Our support staff often uses a screen sharing application named Join.Me.  This application permits our customers to view the screen of our support staff as they are connected to your POS system.  The support staff can then illustrate how certain actions are performed as the customer-user views the steps and actions. This program has proven to be a very useful and time saving tool for all concerned.
There may also be occasions where the support staff may even ask that you give permission for them to be able to control your PC while your are connected to the POS server.  In doing this we will be able to do things for you just as if we were physically at your district.  
To be ​able to use this support service from Systems Design you will need to use a PC app called  join.me  There are a couple of ways to use or obtain this free app.

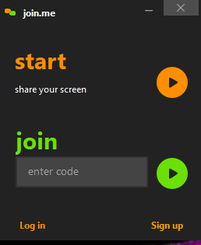
1. You may already have the join.me program installed.  If so you will see a small shortcut icon like the one on the left below.  If you have this then to share screens you simply click on that icon and then the pop up box as illustrated to the right below is presented.  The support staff person will give you a code to type in the green join prompt and when entered you click on the green circle.  You may then share screens.


Picture
Picture

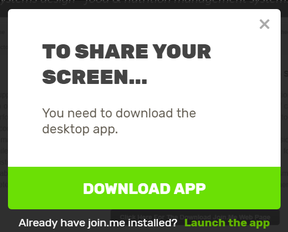
2.  The support staff may send you an email with a link to invite you to the screen share.  If so you will see a box pop up that looks like the one below.  You will be prompted to download the App.  Don't click on the green DOWNLOAD APP bar but look below that and click on the words Launch the app.  If you have the app it will appear and you simply enter the code as indicated above.
Picture

​
​
3. If you do not have the App installed then click on the "Download the join.me app" in the link below  When installed you may call the support staff person and let them know of your success.

​
Click on the link to the right to download and install the join.me app on your PC
Download the join.me app
File Size: 43844 kb
File Type: msi
Download File

Contact Us
Meal App Now
Lunch Money Now
Systems Design Site