Learn Systems Design
  • Home
  • About
  • Protocol
    • Log On To POS System
    • Log Off POS System
    • Unlock A Terminal
    • Check A Printer
    • Back Up Data
    • Download Join Me App
    • Install Hyperterminal 6.3
    • Install the DC ftp App
    • Install WinSCP .ftp program
    • Install Putty
  • Back Office Tutorials
    • End Of Day >
      • Back Office End of Day Video
    • End Of Month >
      • End of Month Video Tutorial
    • Master File Maintenance >
      • Master File Overview
      • Add A Student To The Master File
      • Change Information In The Master File
      • Menu Item Maintenance >
        • Enter New Menu Item
        • Change A Menu Item
        • Move A Menu
        • Menu Item Cost
      • Touch Screen Button Maintenance
      • Correct A Student Balance
      • Meal Input Corrections
      • Meals Per Labor Hour
      • Set A Credit Limit On Charges
      • Teacher Quick Input
    • About Reports >
      • Reports Menu Overview >
        • Print a Student Status Report
      • Other Reports Menu Overview >
        • Print Summary by School
      • Printing From Your PC >
        • Find Your Server IP Address
    • Site Based Claim >
      • File A Digital Reimbursement Claim
      • File A Manual Reimbursement Claim
    • Student Meal Balance Inquiry >
      • Student Meal Inquiry
      • Student Cash Inquiry
      • Print a Student Statement >
        • Student Statement Example
    • Transfer Funds Between Accounts
    • Print ID Cards and Homeroom Bar Code Lists >
      • Print Individual ID Cards
      • Print Home Room Bar Code Lists
    • The Home Room Input Feature
    • The Express Input Feature
    • Shortcut Entries >
      • Cash Report Shortcut
      • Meal Report Shortcut
      • Correct Reconciliation Shortcut
    • Quick Input Programs >
      • Employee Account Input
      • Quick Home Room Input
      • Direct Cert Quick Input
      • Teacher Homeroom Input
    • Community Eligibility Provision
    • AR Reports Information >
      • Section 100 Answers
      • Upload Letter Templates
      • Export Free and Reduced Students
      • Export Denied Students
      • Export Categorically Eligibile Students
      • Export Verification Report
      • Rated Meal Summary Report
      • Export Accuclaim Report For Review Month
      • Export the F R D .CVS File
    • Displaced Students Instructions
    • Find Server IP
    • Program and Non Program Revenue Reports >
      • Expanded Income Analysis >
        • Expanded Income Analysis Example
      • Expanded Sales Summary Report >
        • Expanded Sales Summary Report Example
      • Meal Summary By Date Range >
        • Meal Summary By Date Range Exammple
    • CoVid19 Set Up Process
    • SSO Preperation
    • Change SSO Reimbursement Rates
  • Application Processing
    • Application Program Overview
    • Basic Family Application
    • Multiple Students On Application
    • Multiple Incomes On Application
    • Direct Certification >
      • DC Medicaid Reduce Proceedures >
        • Medicaid Reduced Benefit Letter
        • Set Up User Code
        • Find Student on an Application
        • Print Letter of Benefits
    • Community Elgibility Report >
      • Community Elgibility Report Form
      • CEP Report Instructions
    • Change Grace Period
    • Temporary Status Expiration >
      • Print Letters to Expiring Statuses
      • Print A List Of Expiring Statuses >
        • The Expiring List Report
      • Update Temporary Student Statuses
    • Application Verification Process >
      • Running the Selection Process
      • Print Verification Notification Letters >
        • Printing Second Notice Letters
      • Change Grace Period
      • Print Audit Record Form
      • Print Application Totals Report >
        • Application Totals Report
      • Print Archived Application Totals Report >
        • Application Totals Report from Archives
      • Recording Verification Results
      • Print Adverse Action Letters
      • Print Verification Results Report >
        • Verification Results Report Example
    • Required March 2022 CEP Report >
      • March CEP Report Example
    • PK Categorically Eligible Status
    • PK Audit Report
    • PK True Eco Report
  • Instruction Sheets
    • Changing Meal and Cash History
    • Audit Preperation Instructions
    • Saving .pdf File To iPad
    • Back Office Admin Manual
    • POS Instruction Handout
    • Cashiers Manual
    • Cashier Quick Start Card
    • Correcting Cash Mistakes
    • Correcting Meal Mistakes
    • Direct Certification
    • CE File Upload Instructions
    • Installing Hyperterminal 6.3
    • Program Function Keys >
      • Touch Screen Button Layout
    • Print A Report To Excell
    • Calibrate Touchscreen
    • Summer Feeding Set Up
    • Negative Balance Email Setup
    • Set Up Teacher in LMN
  • Helpful Links
  • Director Orentation
  • Learning For Cashiers
    • Touch Screen Tutorial
    • Touch Screen Overview
    • Home Room Option
    • Log In To The POS
    • Log Off POS Terminal >
      • Log Off Acer
      • Log Off Termteck
    • Recording Meals >
      • Record A Free Students Meal
      • Record A Paid Students Meal
      • Record Ala Carte Sales
      • Recording Adult Meals
      • Recording Checks
      • POS Homeroom Option
    • Cash Receipts Posting >
      • Recording Cash Payments
      • Recording Check Payments
    • Cashier End Of Day Actions >
      • Print Cash Report >
        • The Cash Report
      • Print Meal Transaction Report >
        • The Meal Report
      • Clerk Reconciliation >
        • The Clerk Reconciliation Report
      • Campus Reconciliation >
        • The Campus Reconciliation Report
      • Managers Daily Deposit
    • Correcting Meal And Cash Mistakes >
      • Correcting Meal Mistakes
      • Correcting Cash Mistakes
    • Student Meal Balance Inquiry >
      • Student Meal Inquiry
      • Student Cash Inquiry
    • Cashier Report Menu >
      • Print Student Balances >
        • The Student Balances Report
      • Print School Menu Listing >
        • The School Menu Listing
      • Print Negative Balance Notices
    • After School Snacks >
      • Recording Snacks For Individuals
      • Recording Snacks Multiple Students
    • New Cashier Option >
      • Cashier End of Day Actions
      • Video on New Cashier Option
      • Cashier Option Change Feature
      • New Cashier Reports Option
    • Additional POS Features >
      • The Look Up Feature
      • The Received Listing
      • Quick Meal Totals
      • Balance Inquiry
      • Cash History Inquiry
    • Printable Documentation >
      • Cashier Quick Start Card
      • Touch Screen Information
      • Cashiers Manual
    • If Your Printer Won't Print
  • Contact Us
  • New Install Form
  • Sign Up Page
  • Classroom Help
  • Video Tutorials
    • Change Status of Meal Served
    • Print DC By Association List
  • P-EBT Program
  • Meals in Classroom
  • Non-Congregant Meals
    • NC POS Procedures
    • Clerk Handout NC Meals
    • Holiday Calendar
    • Correcting Prior Day Meals NC

Pre School Categorically Eligible Program

Picture
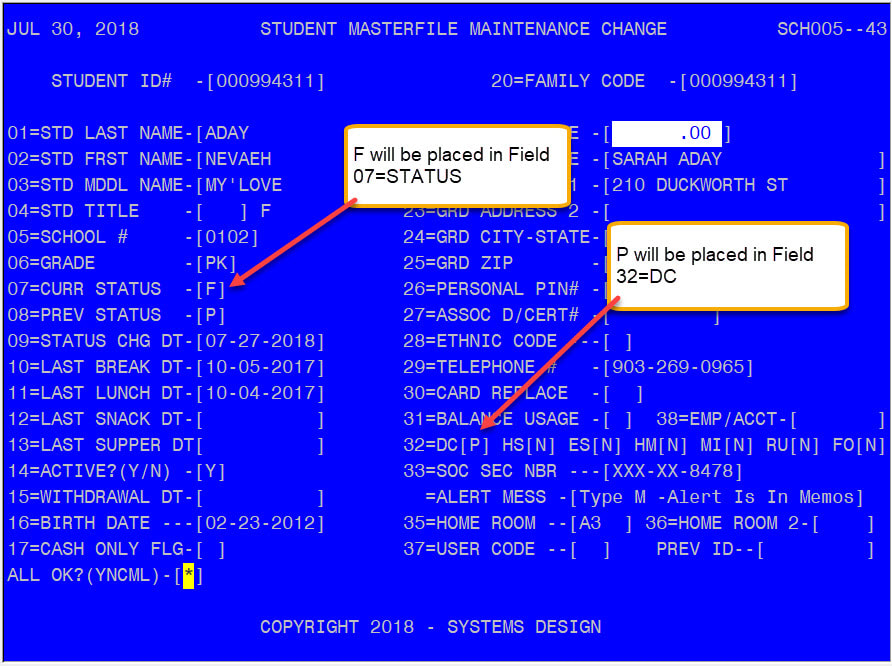
Systems Design’s rollover process, which prepares your POS system for the 2019-2020 school year, will include accommodation of the new PK categorically eligible program.  The program will cause your PK enrollees to be classified in a status of free.  Please notice in the example above that all PK students have a P in Field 32 (for PK) and an F for free in field 07 as a default.  The food service departments should get an official list of all PK students that are approved for this category from the district administration.  In most cases all PK students will be on the official list.  There could be exceptions though, and each district or CE is responsible for checking the list, finding those PK students not on the list and then manually editing the individual PK student master file (FS-01-01) to make the required change to a status other than free. 
 
To remove the categorically free benefit for a PK DC student, navigate to the student master file located at FS-01-01.  Select C for change and at the student ID prompt enter the student id number or enter a ? followed by pressing the Enter Key, typing in the last name of the child, selecting the correct child from the list using the arrow key and pressing the Enter Key.  Once you have the student record displayed, enter N at ALL OK and go to field number 7 and enter P for paid and then go to field 32 and enter a space or N in that DC field.  When these steps are completed, enter Y at the ALL OK prompt at the bottom of the screen to save the change.  You may view a tutorial on making changes to the Student Master File by clicking this link.
 
To print a report of PK students that have a code of "P" in field 32 and a Free Status, navigate to the Reports Menu (FS-04) and select option 11 "Categorically Free List".  Select the desired printer number for the report. Then enter 8 for PK, then enter the specific campus you want or press the enter key to print all campuses.You can then choose either option 1 "ALPHA BY SCHOOL" or 2 "ALPHA ONLY".  Then select 1 for active students.  You will be prompted to enter Y to print the report or N to go back and make changes to your requested print.  The report of all PK students with a P in field 32 (DC field) and a Free Status will be produced.

This program recognizes that a PK student may be included in a family application for free or reduced benefits and will not change the status of a PK student granted categorically eligible free status.  Also note that PK categorically eligible free status will not extend to other students on a family application that qualify for reduced, paid or denied status.
Contact Us
Meal App Now
Lunch Money Now
Systems Design Site